
Understanding Roof Flashing Materials
Posted 3.04.2026 | 7 Minute Read

If you’ve ever had a mysterious roof leak that your roofer traced back to something called “flashing,” you’re not the first. Most homeowners don’t think about flashing until it fails. Interestingly, the majority of all roof leaks start at flashing points. This guide will walk you through everything you need to know about roof flashing, focusing on what actually works in our challenging coastal climate.
What exactly is roof flashing and why does it matter?
Think of roof flashing as the weatherstripping for your roof. It’s thin metal (or sometimes rubber) installed at every spot where your roof has a seam, meets a wall, or has something poking through it like a chimney or vent pipe. Just like weatherstripping seals the gaps around your doors and windows, flashing seals the vulnerable spots on your roof.
Your shingles do a great job on the flat surfaces, but they can’t properly seal the corners, edges, and transitions. That’s where flashing comes in. It creates overlapping metal barriers that guide water down and away from your home, even when wind drives rain sideways or water tries to sneak into gaps.
In South Florida, flashing faces some serious challenges. Salt air from the ocean corrodes metal faster. Our intense sun breaks down rubber components in a few years instead of a decade. Hurricane winds test every seal. The flashing materials that work fine in other parts of the country often fail quickly here, which is why choosing the right type matters so much.
What are the main types of roof flashing on your home?
Knowing the basic types helps you understand what you’re looking at and what your roofer should be installing.
Step flashing
Step flashing is what protects the spot where your roof meets a wall, like where a dormer connects or an addition joins your main house. It’s called “step” flashing because it’s made of individual L-shaped metal pieces, one installed with each row of shingles, creating a stair-step pattern up the wall. This design lets your roof and walls move independently (they expand and contract at different rates) without breaking the water seal.
Valley flashing
Valley flashing goes in those V-shaped channels where two roof sections come together. During one of our South Florida afternoon thunderstorms, an enormous amount of water flows down these valleys, so the metal here needs to be wider and stronger; usually 24 to 28 inches wide with a raised ridge down the center to keep water from splashing across.
Drip edge
Drip edge is the metal strip that runs along the very edge of your roof. It might look decorative, but it’s actually preventing water from curling back up under your shingles through capillary action (the same force that makes water climb up a paper towel). Many older homes in South Florida don’t have this, and that often results in rotted fascia boards and damaged soffits.
Chimney flashing
Chimney flashing is the most complicated setup you’ll encounter. It uses multiple pieces such as base flashing at the front, step pieces up both sides, counter flashing embedded in the mortar joints, and an apron at the back. If your chimney is wider than 30 inches, you also need something called a cricket, which is basically a peaked structure that diverts water around the chimney. This complexity is why chimney flashing is the number one cause of roof leaks.
Kickout flashing
Kickout flashing might be the most important piece on your entire roof, even though it’s no bigger than your hand. It’s an L-shaped piece installed where a roof-to-wall junction ends at a gutter. Without it, water runs straight down behind your siding instead of into the gutter. We regularly see homes with $15,000 in hidden wall rot from a missing $20 piece of kickout flashing.
Vent pipe flashing
Vent pipe flashing (also called a boot) seals around those plumbing pipes sticking up through your roof. Most use a rubber sleeve that fits around the pipe. However, it is important to note that these rubber boots are usually the first thing to fail. Your shingles might last 25 years, but those rubber boots often crack after just 10 to 15 years in South Florida’s sun.
Which materials hold up in South Florida’s tough climate?
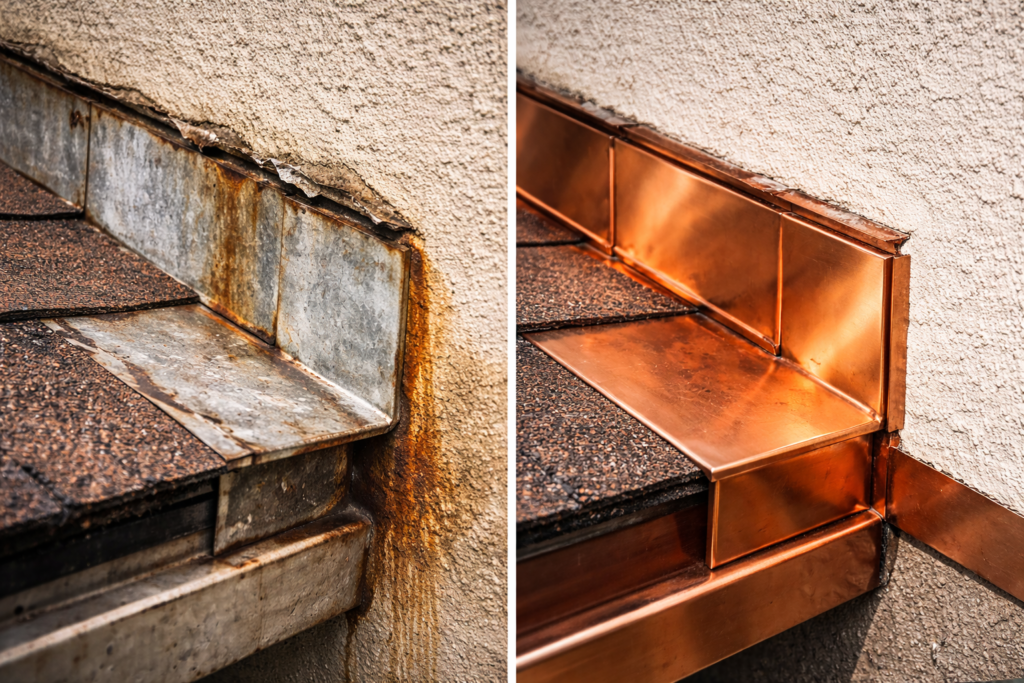
Your material choice determines whether your flashing really lasts. Galvanized steel is the cheapest option which is why it’s everywhere. Standard galvanized steel lasts about 20 years in typical conditions, but near the coast, salt eats through the protective coating much faster. If you’re within a few miles of the ocean, skip galvanized steel entirely. Stainless steel is the best for corrosion resistance, particularly Type 316 stainless steel (marine grade). It resists the salt corrosion that destroys everything else and lasts 50 to 100-plus years.
Aluminum costs about the same but handles salt air much better. It won’t rust because there’s no iron in it, and it should last 20 to 30 years. The downsides are that you can’t use it around brick or stone chimneys because something in the mortar makes it corrode, and it can’t be soldered like copper can. For homes away from the immediate coast without masonry chimneys, aluminum is a solid middle choice.
Copper is the premium option that lasts 60 to 100-plus years. Copper can be soldered for watertight joints and actually gets better over time as it develops a protective coating. The only real downside is that copper turns green over time, and that green can stain walls below it. If that bothers you, lead-coated copper stays silvery-gray instead.
Flashing Tip: For those rubber vent pipe boots, consider upgrading to all-metal versions. You’ll pay more upfront but save yourself from leak repairs down the road.
How can you tell if your flashing is failing?
During your regular walks around your property, look for rust or white crusty corrosion on metal flashing, pieces that look lifted or bent, missing caulk around joints, and rubber boots that have faded from black to gray or show cracking.
Inside your home, pay attention to water stains on ceilings near chimneys, vents, or skylights. Even small stains might mean you have active leaking. If you only get leaks during heavy wind-driven rain, that’s a sign flashing has lifted. Musty smells or visible mold in your attic also point to water getting in somewhere.
With rubber pipe boots specifically, if you can see fine cracks or the rubber feels hard instead of flexible, it’s about to fail. Don’t wait to take action because that cracking turns into splitting, and splitting means leaking. After any major storm, grab binoculars and check your roof from the ground for displaced or damaged flashing.
How do you maintain flashing?
Maintenance is simple for your roof flashing. Get professional inspections twice a year in spring and fall. Keep debris cleared from valleys and around flashing. Reapply quality sealant every 3 to 5 years. Replace rubber pipe boots at the 10-year mark before they fail. After major storms, do a visual check from the ground with binoculars.
A little preventive attention keeps everything working properly and catches small issues before they become expensive problems. In the event that they do occur, small problems can usually be fixed. Surface rust that hasn’t eaten through the metal, small gaps that need fresh sealant, and loose pieces that need re-fastening are all repairable. However, if you see holes in the metal, cracked or missing sections, or rubber boots that have hardened and split, you need replacement.
For South Florida homes, we recommend upgrading materials during roof replacement even if your old flashing technically still works. If you’re putting on a new 30-year roof, upgrade to stainless steel or copper flashing so you never have to think about it again.
Make the smart choice for your property
At Coastal Roofing, we’ve protected South Florida homes and businesses for years. We know which materials survive our climate, which installation methods stand up to hurricanes, and how to spot problems early. Whether you need a complete roof with proper flashing, repairs to aging flashing, or just an honest assessment of your current roof, we’re here to help.
Don’t wait for water stains or leaks. Contact Coastal Roofing today for a thorough inspection and expert insight about what your property needs. We’ll explain your options clearly, provide a detailed estimate, and make sure your roof keeps South Florida weather where it belongs: outside.
Recent Articles
Check Out Our Blog
